Archives

Tomato Blight & A Cake Sale

My small garden is continuing to produce crops.

This week I have been picking cucumbers (both indoor and outdoor ones), raspberries, runner beans courgettes, patty pans and I dug up the rest of my early potatoes (marfona) and a few of my main crop potatoes (desiree):

SAM_3622 SAM_3648 SAM_3599 SAM_3651 SAM_3649 SAM_3617

I also picked my first kohl rabi of the season – which my daughters love to eat raw, dipped in salad cream, hopefully there will be more soon:

SAM_3607 SAM_3608

.

I have also continued to pick tomatoes from my greenhouse and chery tomatoes from my outdoor hanging baskets:

SAM_3633 SAM_3641

However, I spotted the dreaded ‘blight’ on my outdoor tomatoes.  I grow a variety called ‘outdoor girl’ which usually give me a good crop each year before blight strikes, however this year they didn’t grow as quickly as usual due to a colder start in late Spring and so all the tomatoes were still green.

Tomato blight:

SAM_3630 SAM_3632 SAM_3635

“Tomato blight is caused by the same fungus as potato blight.  It is called ‘Phytophthora infestans’, but it is more commonly known as ‘late blight’.  It is a windblown fungus that can travel long distances.  It spreads when the temperature is above 10C and the humidity is above 75% for two consecutive days, known as a ‘Smith Period’.   In the UK outbreaks can occur from June onwards and apparently it is usually seen in the south west first.

The disease is common on outdoor tomatoes – tomatoes grown in a polytunnel or greenhouse have a bit of protection from it, as the spores have to enter through doors and vents.

The early stages of blight can be easily missed and not all plants are affected at the same time, however it will spread rapidly”

.

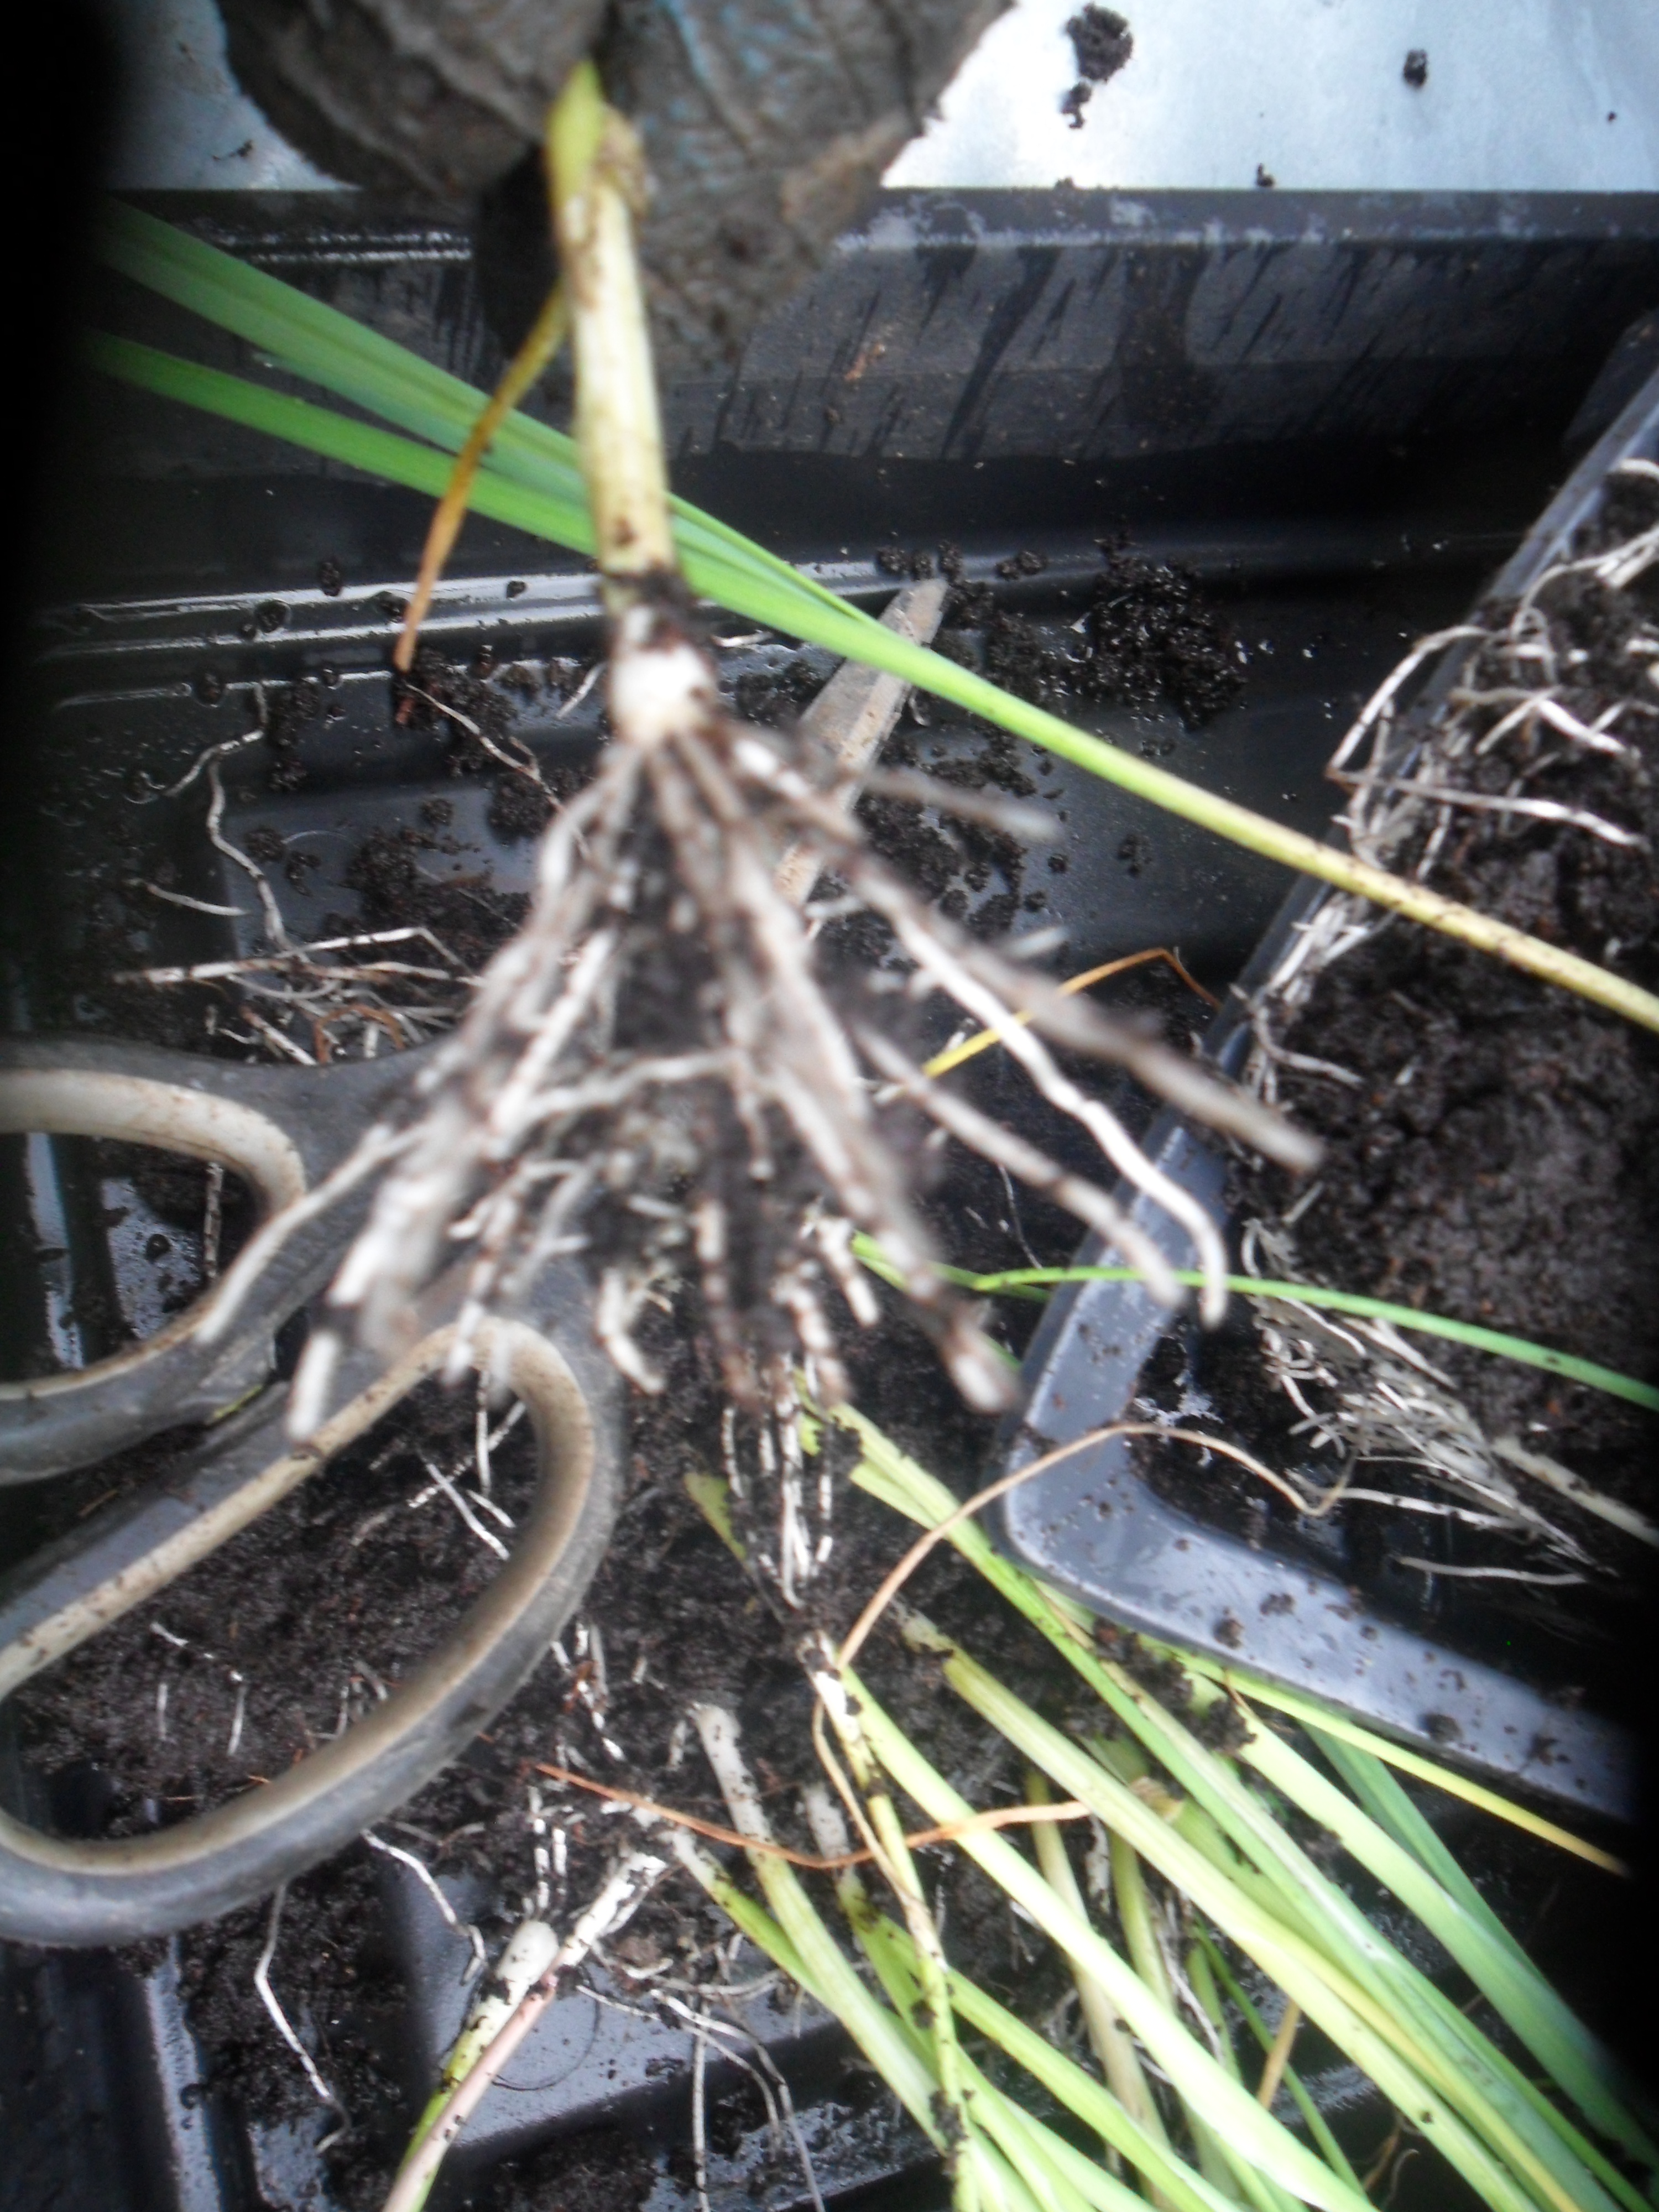
For some strange reason, the tomatoes next to my shed and my cherry tomatoes in hanging baskets haven’t yet succumbed to the dreaded blight, though I am checking them daily, together with my greenhouse tomatoes:

SAM_3637 SAM_3628 SAM_3629

However the cherry tomatoes that are growing in pots, began to show blight symptoms a couple of days after blight was first spotted in my garden:

SAM_3650

.

What to do if you spot blight on your plants:

.

“If you catch blight early you can strip the tomatoes from the plant and ripen them on a windowsill.  Be careful to check them every day as some of them may already be affected.

If you have caught it really early, you can use the green tomatoes to make chutney, as provided they haven’t turned brown, the tomatoes are safe to eat.

Take up your blighted tomato plants straight away and dispose of them, so you don’t help to spread the spores to your neighbour’s plots.

 According to ‘Garden Organic’ the stems and leaves of affected plants can be added to your compost heap, as the spores won’t survive on dead plant material, but do not compost any blighted fruit (the tomatoes) as the spores survive in the seeds inside”

 .

My tomatoes are now on trays waiting to ripen….I always pick them off the plants when I first spot blight and this way I manage to save approx 75% of the tomatoes…provided blight is spotted early enough:

 IMG_3979

.

.

I’ve been busy in the garden this week, summer pruning and cutting back overgrown plants.

I started with the pyracantha that was trying to escape over the fence into next doors garden.  The trunk was quite thick at the top so I had to ‘saw’ the top off.  Unfortunately I did lose most of the berries that would have ripened in autumn, but it needed to be done before it upset the neighbours:

SAM_3598 SAM_3600

I then removed the sweet peas that were growing in a pot…they have given a wonderful display, but they sadly succumbed to mildew and were hardly producing any more flowers:

SAM_3603 SAM_3604

 I also removed the sweet peas that were growing over the arch I made, again they gave a wonderful display but they also succumbed to mildew and had stopped producing flowers.

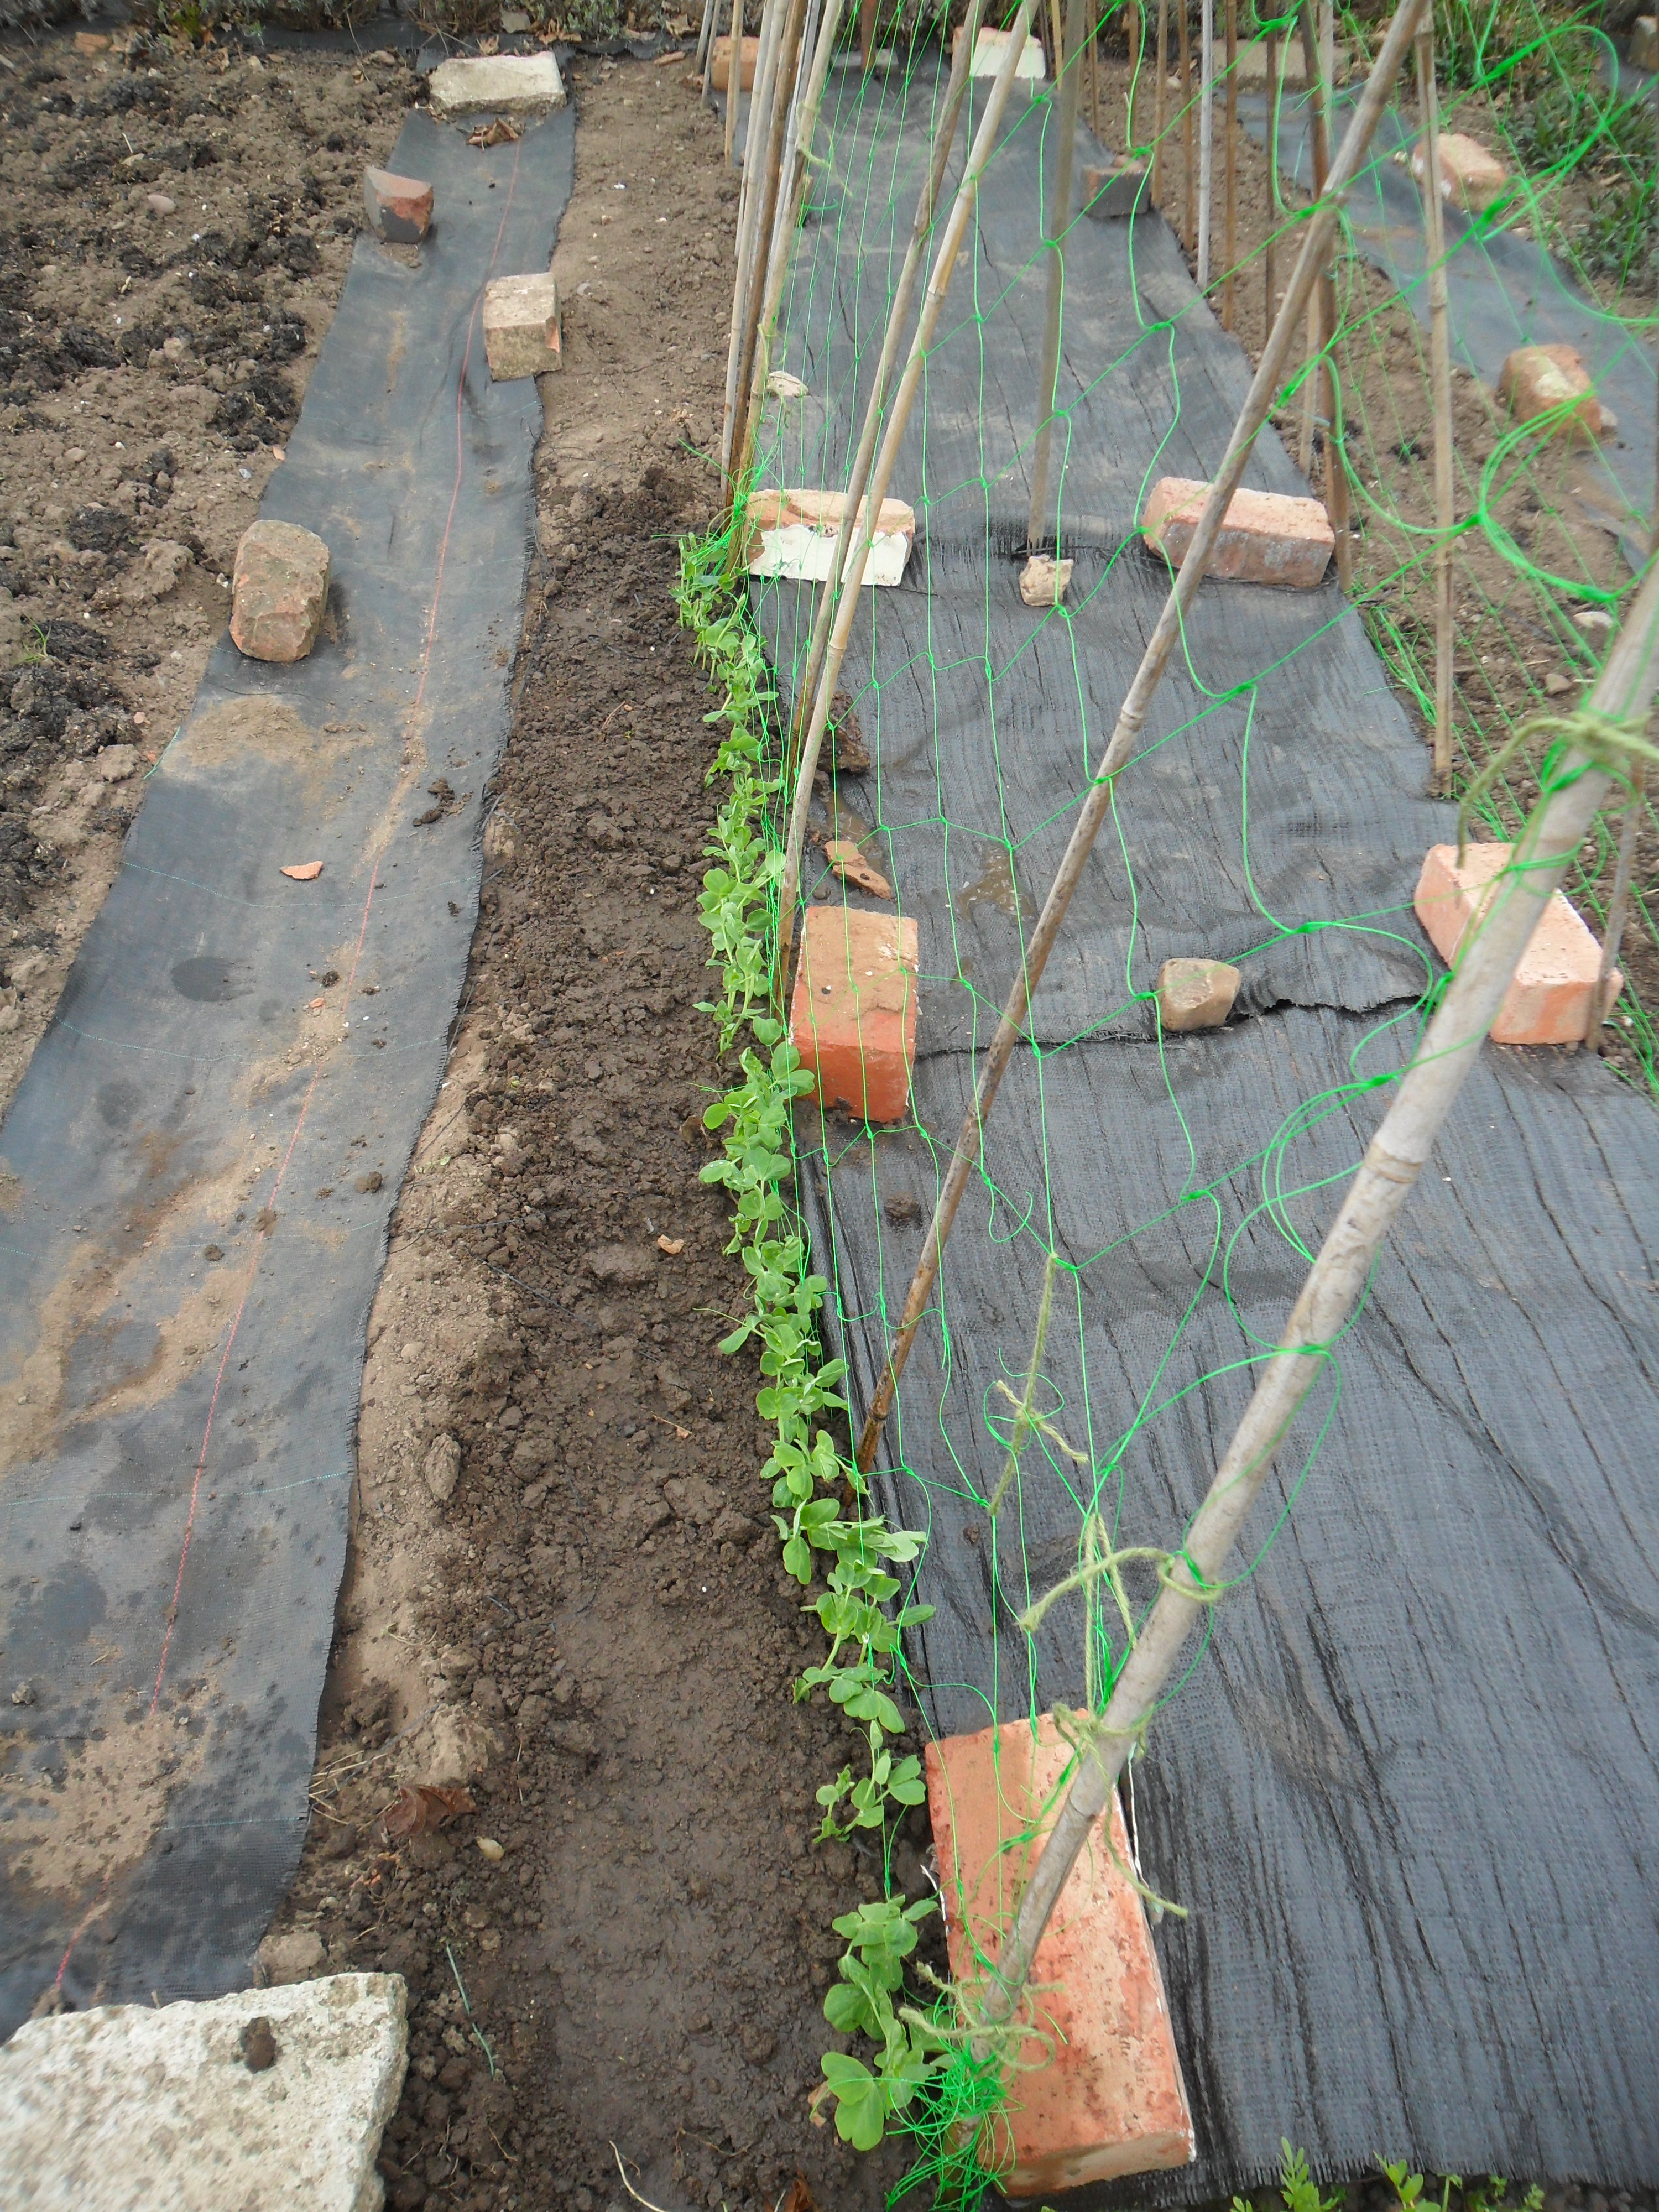
At the end of May I had also planted two pumpkin plants (that produce small pumpkins) alongside the sweet peas……these are growing nicely now and I made sure they tied onto the arch for support:

SAM_3605

I also gave my bay tree a summer prune and it smelt lovely as I was cutting the leaves.  It looks much neater now:

SAM_3601 SAM_3602

.

One final job this week was to remove the lettuces that I tried to grow in guttering.  Unfortunately they didn’t do very well at all.  When I first planted them it was very wet and as they were so close to the fence…. I thought that they would stay really dry, however this was not the case and they were too wet and I suspect the roots began to rot.  This was followed by really hot weather and  the compost was really really dry even though I watered them every day.

So I removed the compost and drilled drainage holes along the guttering so the new compost wouldn’t become water logged in bad weather:

SAM_3623

I then thought about how I could keep the compost from drying out too much and came to the conclusion I should use water retaining granules…but I didn’t have any.  Then I remembered that in a gardening program once, Christine Walkden said she used old sponges that she cut up…..so this is what I did:

SAM_3624 SAM_3625

I then mixed the sponge with compost and put it in the guttering……

SAM_3626

…..and then I sowed some more lettuce seed.

Unfortunately the local squirrel came along then and buried some monkey nuts in a couple of places, so I had to put some wire over the guttering too:

SAM_3652

I will let you know if this now works.

.

.

This week in the home:

.

This week has been a baking week.  My youngest daughter did a cake sale with her ‘NCS’ friends to raise money for ‘Wishes 4 kids’ and my eldest daughter and I helped by making some little cakes for her.  I also made a chcolate cake to raffle off and altogether they raised £120, which is incredible.

SAM_3612

However an hour after starting the sale they were beginning to run out of cakes and I quickly made some more.  I made 28 chocolate chip fairy cakes, 12 double chocolate muffins and a massive tray of cereal cakes and I defrosted some cheesy courgette scones from my freezer (which defrost quickly).  I somehow managed to deliver them all in the car within 65 minutes…..I didn’t know I could bake that quickly, but it helped that I knew the recipes off by heart.  Unfortunately when I got back home the kitchen was in a right mess with pots and bowls everywhere, but at least they raised some more money at the cake sale.

SAM_3616 SAM_3615 SAM_3614 SAM_3613

.

This week I have also been doing my usual baking…

SAM_3610

And I also made some cheesy courgette scones which I froze for another time (though most of them went to the cake sale in the end):

SAM_3611

.

I also made some laundry liquid as I had run out (I still love making this as it is so cheap and I really can’t understand why I brought expensive powders for so long when laundry liquid is so cheap and easy to make):

SAM_3526

And finally I made some homemade burgers to freeze for another time and some to have for tea.  Homemade burgers are delicious as they actually taste of beef (I never think shop brought ones do).

They are so easy to make……I mix good quality lean mince beef with a couple of grated onions and a chopped garlic clove and I then mix in an egg to bind it altogether.

You can mix in any herbs and spices too if you want….a teaspoon of chilli powder makes them taste delicious too.

SAM_3504 SAM_3505

I then take a handful and roll it into a ball and then flatten it into a burger shape (make sure your burgers aren’t too thick or they won’t cook evenly).  At this stage you can freeze the burgers between pieces of greaseproof paper for another time, or you can fry them until they are cooked.

SAM_3506

I served ours inside homemade rolls with salad, mayonaise and a slice of cheese.  I also added a side portion of sweet potato wedges and they were a real treat!

  SAM_3508

.

Thank you for reading my blog today, I will be back next week as usual.

Have a great week.

XXX

Radish In Guttering & Sweet Potato Wedges Recipe

Last week the weather was so hot and my soil was bone dry.  The greenhouse reached temperatures of 45 degrees celcius and I had to quickly put up some greenhouse shading….this week it has rained nearly everyday and there has been floods in the County…what a difference in just one week!

IMG_3811 IMG_3822

Up until the last few years June was always sunny and warm, but in recent years we have had record rainfalls recorded in June and July…..is this climate change or just the seasons changing?

.

This week in my kitchen garden:

.

This week in the garden I picked our first strawberry of the year….and it was delicious (though I did have to share it with my daughters):

SAM_3213 SAM_3220

I also picked our first courgette this morning….we always get excited when I pick the first courgette of the year (even though we know that soon we will be groaning when they are coming thick and fast in a few weeks time).

SAM_3223 SAM_3250

I have one last spring cabbage to pick and eat this week….the cabbages have been in the ground since last year so I always find it quite sad when I pick the last one, however next week I will be planting my curly kale in this area:

SAM_3229

Also I will now start to use some of the onions that I am growing….I planted them close together so I could use some of them as spring onions.  The onions that I leave will then develop into full sized onions:

SAM_3246

.

The rest of the garden is growing well and my broad beans are nearly ready to pick as well:

SAM_3228

My dwarf pea plants are ladened with pea pods ready to fatten up…

SAM_3247 SAM_3248

And I have currants, gooseberries, blueberries  and a few plums growing (I can’t wait to taste these when they are ready)…..

SAM_3242 SAM_3243 SAM_3238 SAM_3237

My cherry tomatoes are flowering well in my hanging baskets….so hopefully I will soon have some tiny tomatoes growing.  As soon as I see mini tomatoes growing on my plants I start to feed them once a week with a high potash feed (e.g comfrey which is perfect for tomatoes):

SAM_3249

I have my first flower on one of my potato plants, however I didn’t get around to earthing my potatoes up this year and I think it is too late now as I can hardly see the soil around them.  It will be interesting to see how much my yield is affected….my old friend at my old allotment site never earthed her potatoes up and she said it never affected her yield….we will see.

SAM_3235

The greenhouse is doing well too.  I have cucumbers and tomatoes growing and I spotted my first peppers growing too this week:

SAM_3226 SAM_3227 SAM_3225

 .

Over the last week in the garden I planted my sweetcorn and pumpkins.  I sowed the sweetcorn in April in newspaper pots and they have grown well, though I am a little late planting them out.  In the space where I needed to plant my sweetcorn was my ‘lollo rossa’ lettuce, which has been providing us with an outstanding amount of cut and come again salad leaves this year and I just couldn’t bring myself to pull them up until now.

SAM_3059 SAM_3129

I planted the sweetcorn and then I planted three pumpkin plants in between them.  The pumpkins will hopefully produce small, palm sized fruit that I can roast, but as I have never grown this variety before I am not sure how big the foliage will grow….so it’s a bit of a trial:

SAM_2974 SAM_3152 SAM_3154 SAM_3153

I have also planted some leeks this week, but unfortunately I did have to buy them from my local nursery as I had somehow missed watering mine when the weather was really hot and managed to kill my lovely seedlings – which I was gutted about!…but at least it proves I’m human.

As normal I trimmed the roots to make them easier to plant and then pushed each leek seedling into a four inch deep hole made with my dibber and then I just watered the hole….don’t worry if you can still see the roots as the soil will fill around the leeks as they grow helping to blanch the stems:

SAM_3207 SAM_3209 SAM_3210

I then covered them with environmesh as last year I lost a lot of leeks to the allium leaf miner:

SAM_3208 SAM_3212

.

Two weeks ago I sowed some more radish.  I decided to have a go at planting them in a piece of guttering as I have read this works well.  I didn’t want the slugs to eat them so I made a ‘moat’ around the guttering in the hope the slugs won’t swim (this was a tip I learnt at the ECO House Garden Forum a few years ago before the ECO house shut)….

SAM_3109 SAM_3110

…..And this week the seeds have emerged and so far there has been no slug damage:

SAM_3245

 .

I have also continued to sow coriander, for my windowsill,  spring onions and lettuce over the last couple of weeks and I have been surprised at how quickly they have germinated:

SAM_3196 SAM_3198

And finally this week in the garden I have finished planting my remaining bedding plants (I couldn’t plant them before in this area as my wall flowers were still flowering):

SAM_3160 SAM_3159

Hopefully they will grow well now and flower soon.

.

.

This week in the home:

.

This week I decided to give the basil on my windowsill a good haircut as it was getting too big.  I placed all the leaves in a paperbag and hung them in a warm place to dry.  In a few weeks I will pass the dried leaves through a seive to remove any stalks and put the dried leaves in a jar to use over the winter:

SAM_3106 SAM_3107 SAM_3108

.

This week I also started some elderflower champagne…. as there are plenty of elderflowers around on our local park.  I have never made it before and I chose to use a recipe they gave on ‘River Cottage Bites‘.  I won’t tell you how I made it yet as I want to make sure it works…..but it smells wonderful at the moment.

SAM_3114 SAM_3115 SAM_3132

.

Over the week I have also been making large batches of food to freeze.  I made pasta / pizza sauces and spaghetti bolognaises and a big pot of soup to freeze in portions:

SAM_3118 SAM_3134

 IMG_3806

.

I have also been trying very hard to use the herbs that I have been growing….

SAM_3010

I have used them in meals such as omelettes etc. and sprinkled them over our roasted vegetables before I cook them.  I have also been chopping a bit of mint to sprinkle over our vegetables when I serve them.

  It is so nice to have fresh herbs to use, especially as the herbs I grew last year in a different place were a disaster due to our local squirrel population digging them up every five minutes at the end of my garden!

SAM_3112 SAM_3111

.

This week I made some sweet potato wedges and they were really nice.  I made them in exactly the same way as I make normal potato wedges, except I only cooked them for 30 minutes on Gas 6 / 200C.

(The normal potato wedges recipe I used can be found here).

SAM_3117 SAM_3123

.

I cooked the sweet potato wedges to accompany a homemade pizza, which I served with homemade coldslaw and salad.  My sister gave me the idea of making the base with half strong wholewheat flour and half strong white flour to make it a bit healthier and she was right as it turned out really, really nice.

I have written the recipe I used in my breadmaker below…..it makes two large pizza’s so I froze half of the dough for another time.

.

Wholemeal Pizza Dough Recipe

.

300mls water

2 tablespoons Olive oil

½ teaspoon salt

340g strong white flour

290g strong wholemeal flour (plus some for rolling out)

2 teaspoons yeast

.

Put all the ingredients into your breadmaker and put it on a ‘pizza dough’ setting:

SAM_3119

Split the dough in half and put half in your freezer for another day:

SAM_3120

Roll out the dough and and place it in a greased pizza pan:

SAM_3121 SAM_3122

Leave to rise for 30 mins in a warm place with a clean tea towel over it.

Spread a pizza sauce over the base.  You can find my pizza sauce recipe here (it’s the same recipe as pasta sauce).

Top the pizza sauce with whatever topping you choose and then mozzerella cheese, either grated or sliced.

Sprinkle with basil and organo to give it an italian pizza taste and cook for 14 minutes on gas mark 6 / 400F / 204C.

SAM_3124 SAM_3126

Enjoy!!

.

Well that’s it for today.

Thank you for reading my blog today.  I will be back next Friday as usual.

Have a great weekend!

XXX

A Chicken and Parsnip Stew & A Fruit Loaf Recipe

I thought I would start today by letting you know that Judy, (our lovely rescue dog) has made a full recovery after her illness last week and she is back to her normal, cheeky ways.

SAM_2558

We all absolutely love Judy to bits and I am so glad we didn’t give up on her like the previous three owners did.  Though I have got to be honest, when our previous ‘dog behavourist’ told us she was untrainable last February, we were very close to giving up….she had so many problems e.g. barked all the time at home, barked and lunged at dogs, people, cars, bikes, lorries, washing machine, birds etc. etc.

Nearly a year later, she still has one or two things she doesn’t like, but she is getting so much better as time goes by, thanks to our wonderful dog trainer Steven Havers.

.

Curtains for my daughter:

.

IMG_2733

I’m not sure if you remember a couple of months ago I decorated my youngest daughter’s bedroom.  I struggled to find any ready made curtains that she liked, to finish off the bedroom.  So in desparation I took her to a material shop and she found some fabric she liked, so I bought it promising to make her curtains after Christmas.

SAM_2508

The curtain material and new furniture in her bedroom was a present for her birthday and Christmas, but because of this I was a bit concerned that she wasn’t going to have many presents to actually open on Christmas day.  So during December, while she was at school I worked really hard to make the curtains so I could wrap them up for her to open on Christmas day.

She was very surprised when she unwrapped them and I must say I am very proud of them now they are up:

IMG_2909

I also had a bit of material left so I managed to make a couple of cushions for her too, which I also wrapped up for her to open on Christmas day:

IMG_3037

.

Over the Christmas holidays I decided it was time to catch up with one or two jobs that I had been putting off…..

  I started by clearing our loft and it was amazing how much rubbish we had up there.  I have since sold one or two bits on ebay and given away some other things…..but most of it was thrown away.  But the attic looks better now.

IMG_2959 IMG_2956

I also went through my bills folder…..again there was a lot in there that I didn’t need to keep.  Myself and Mr Thrift looked at every bill we pay to see if we could possibly reduce it….unfortunately we are quite ‘bill savvy’ so we didn’t manage to make any savings, but it’s good to check every so often.

IMG_2960

.

.

Over the Christmas period myself and Mr Thrift surprisingly managed to buy lots of ‘whoopsies’ ….for some reason we seemed to be in the supermarket when they reduced their produce to ridicuously low prices.  So over Christmas I froze whatever I could and my freezers were bursting:

SAM_2520 SAM_2521 SAM_2523 SAM_2525 SAM_2526

The last photo shows the ready cooked beetroot that was reduced.  My dad sometimes buys this and pickles it, but as I already have pickled beetroot in my pantry I decided to cut it up and freeze it on a tray.  When it was frozen I put it in a bag and this way it is easy to take a few slices out at a time to defrost for sandwiches.

I also used the reduced parsnips and Chicken drumsticks in a chicken and parsnip stew which I cooked in my slow cooker.  By cooking it in the slow cooker you find that the chicken ‘falls off’ the bones easily and tastes so moist:

.

Chicken and Parsnip Stew:

.

6-8 chicken drumsticks or thighs

2 onions peeled and roughly chopped

4 -6 medium parsnips peeled and chopped into chunks

Hot Chicken stock to cover

.

Put all the ingredients into a slow cooker making sure the hot stock covers the ingredients.

SAM_2532

Cook on ‘low’ for approximately 8 hours

Serve with vegetables of your choice:

SAM_2534

.

.

This week…

This week at home I decided to use up the mixed fruit that I had left over in my pantry.  I decided to make a fruit loaf (which I absolutely love).  It’s really easy to make in a bread maker and I used my bread slicer to cut it into nice thin slices.  This loaf freezes well so you can take a couple of slices out to defrost when required:

.

A Fruit Loaf Recipe:

1 teaspoon of Fast Action Dried Yeast

400g Strong White Flour

2 teaspoon Granulated Sugar

75g margarine or butter

½ teaspoon Salt

1 teaspoon Cinnamon

1 teaspoon Mixed Spice

2 Eggs

110ml Water

110ml Milk

300g Mixed Dried Fruit


Add all the above ingredients into a breadmaker EXCEPT the mixed fruit.

SAM_2561

Set your breadmaker to a ‘Basic bake loaf’ with raisens and add the mixed fruit when the breadmaker tells you too (that is approx. 47 mins after the start in mine but you will need to refer to your own manual).

SAM_2562 SAM_2568

Enjoy it!

IMG_2995

.

.

In the garden this week:

This week in the garden I dug up my parsnips.  This is the first time I have grown a crop in this area so I wasn’t sure what they would be like….but they weren’t too bad (though most of them were a lot smaller than the ones I used to grow at the allotment -probably due to the condition of my soil):

IMG_2994 IMG_2993

Parsnips next to a 30 cm ruler

Unfortunately some of the parsnips suffered from parsnip canker:

SAM_2557

.

“Parsnip Canker is a fungus that causes orange, brown, purple or black coloured rot, which usually starts at the top of the root.

I have read that the fungus is caused by drought, over-rich soil or damage to the crown, BUT I have also read that it is worse in wet, pooly drained soils as well”

.

SAM_2559

As you can see in my photo above, if the canker isn’t too bad the parsnip under the skin is usually fine to cook and eat.

.

To avoid canker:

  • Rotate your crops
  • Don’t manure your soil before growing parsnips
  • Improve your drainage
  • Grow resistant varieties such as ‘Albion’or Hollow Crown

.

As I had too many parsnips to eat in one go, I peeled and chopped them and then froze them on a tray (without blanching them).  When they were frozen I took them off the tray and bagged them up.

When I next cook a Sunday lunch I will roast them from frozen.

SAM_2560

.

.

Finally this week I brought my seed potatoes.  I chose my usual ‘Marfona’ which is a second early and ‘Desiree’ which is a red main crop potato.  I also brought some ‘picasso’ to plant in my mother in laws garden, which are an early main crop.

All the potatoes are now ‘chitting’ in our bedroom…..very romantic!

IMG_3039

That’s it for this week.

  Thank you for reading my blog today, I will be back next Friday as usual.

Have a good week!


Easy Stew & A New Area in My Garden

It’s been another wet week here and I have been dodging the showers.  It has also been very mild for this time of the year too and at times I have been too warm in my coat which is strange for November.

My primroses are still flowering, obviously very confused by this years weather:

SAM_2326

However, the trees on the park are shedding their leaves thick and fast now and soon the only trees left with leaves will be the evergreens……..

IMG_2814

……..and this reminded that Christmas is on it’s way and I will soon need to make my Christmas cake and start to prepare my hampers.

IMG_2819

.

Unfortunately my step dad has been poorly for the last month or so and he ended up in hospital twice this week.  This has meant I haven’t had a lot of time to do the things at home that I normally would, as my sister and I have been visiting him and looking after my mum.

I have been very, very glad that I have had some meals prepared in the freezer as it has been an extremely tiring week.  One day as well, I used my slow cooker to make a stew……it has been ages since we have had stew and it was gorgeous!

I used stewing steak that I had lurking in the bottom of my freezer.  I am ashamed to say I brought it a year ago and it has remained there ever since:

SAM_2300

.

A Stew Recipe:

I make stew the way my mum taught me…….I put in the cubed stewing steak, a couple of chopped onions, peeled potatoes cut into quarters and whatever vegetables I have available

(I don’t even bother to brown the meat):

SAM_2301

I sprinkle with mixed herbs and then cover the whole lot with beef stock:

SAM_2303

I then leave it in my slow cooker all day on low

(if you haven’t got a slow cooker you can cook it in your oven in a casserole dish for

2 ½ – 3 hours  on gas 4 / 180C / 350F )

SAM_2315

.

In my garden this week:

.

The curly kale is providing lots to harvest and so too is my perpetual spinach:

SAM_2325 SAM_2323

The leeks I planted in early summer are now ready for me to harvest when we need them….I can almost taste the leek and potato soup I will be making when I get a chance.  They are not as big as I would normally like as I was late sowing them this year, but they are big enough to eat and that’s good enough for me:

SAM_2328

My lettuces under the environmesh are still producing lovely salad leaves….

SAM_2283

….And the lettuces I planted under a cloche are growing well now and hopefully I can soon start to use the odd outside leaf or two:

SAM_2320

I am still picking a few raspberries each week, which has surprised me as this is the first year of growth since I transplanted them from my old allotment:

SAM_2321 SAM_2324

 Incidentally the tomatoes that I brought inside last week are continuing to ripen on my windowsill…..I am amazed that I am still eating homegrown tomatoes in November:

SAM_2281 SAM_2317

And I also have plenty of stored potatoes left to use, which is something I didn’t think I would have after giving my allotments up in January this year.  It has made me really appriciate what I do have growing in my back garden:

SAM_2316

.

The one thing I managed to do in the garden this week was to start my new vegetable area.  I don’t know if you remember, back in September I began to rearrange my garden so I could use all the available space to grow fruit and vegetables, but also to have a space for my little dog to use.

I began by removing the slabs (which really served no purpose) and after preparing the ground I laid a new lawn in their place:

SAM_1793 SAM_1872

I put chicken wire around the lawn to temporarily stop the dog from running on the lawn until it rooted into the ground below.

The grass has now rooted really well and this week Mr Thrift helped me to remove the chicken wire.  He also helped me to bring forward the fence and gate so it is level with the end of the new grass.

SAM_1951 IMG_2810

Judy absolutely loved the new grass to run around on and ‘sniff’ and she didn’t stand still long enough for me to take a photograph, which is why the photo below is blurred!

IMG_2812

We also started to lay a new path around the greenhouse, using the slabs I removed in September….unfortunately we only managed to lay three slabs and we ran out of time:

IMG_2809 IMG_2811

The next day I started to dig an area along the fence to create a small flower garden.  At the beginning of the year I grew flowers in front of the fence and my dog destroyed some of them, so this time I decided to put the new flower bed behind the fence:

SAM_2305 SAM_2307

I removed the old worn out grass along the fence (which I will use later).  As the area has been walked on for years I used my fork  to aerate the soil, to ensure that the drainage is good.  I then planted some daffodil bulbs that I brought at the beginning of September:

SAM_2311

To be honest some of the bulbs didn’t look too brilliant, but I planted them anyway as I have nothing to lose.  It’s also a bit late for daffodil bulbs, but I have planted them in November before and they grew well.:

SAM_2312

I then added some compost to the soil and planted the wallflowers I grew from seed.  Hopefully my new area will give a good display in the spring:

SAM_2319 SAM_2318

 I still need to do alot of work in this area, but first the slabbing must be completed around the greenhouse and unfortunately I need Mr Thrifts help for this, as I can’t lift the slabs on my own.

.

So that’s it for this week.  I will be back next Friday as usual.

Have a great week!

Clematis still in flower in my garden

Clematis still in flower in my garden

Our Rescue Dog Judy & A Paint Job

My blog is a little bit longer than normal this week …. I hope this is ok with you.

A Bit Of Good News:

A lot of people have been asking about Judy, the rescue dog we brought home in October.

Her first day home

Her first day home looking very thin!

I have written about her a few times, but for those who don’t know, it was clear from the start that she had a lot of problems and by December she had bitten a dog and we had to contact a behaviourist for help.  We tried training her with treats, clicker training etc. and she had a ‘kalm aid’ in her food and a pheromone diffuser plugged in the house all day long.

We were beginning to think we were getting somewhere and then the next day for no apparent reason she would go backwards again and we were no further forward.  I have shed a lot of tears over this dog and I have been shouted out so many times for not controlling her (even though she was always muzzled and on a lead).

By February our behaviourist suggested we should think about re-homing her as she felt she was in the wrong environment.  However, as a last attempt to help her we decided to take her to the vets for tablets to calm her down, which did help her a lot in the home, but outside she still couldn’t tolerate cars, lorries, bikes, dogs, birds, men in dark clothes or hats etc. etc.

I have got to admit at this stage we found ourselves thinking that we couldn’t do anything to help her and we were devastated.

A 'cheeky girl' found cuddling my daughters teddies

A ‘cheeky girl’ found cuddling my daughters teddies

Then six weeks ago, a wonderful person called ‘Michelle’ from my gardening forum, emailed me to say she had just listened to ‘Steven Havers’ on Radio Leicester and he was a dog trainer / behaviourist and sounded really good.  I rang him and he visited on the 27th April.

I have been taking Judy to his classes each week since and in just five weeks, Judy will now walk along side other dogs on her extendable lead without reacting.  Mr Thrift counted twenty two dogs surrounding her a couple of weeks ago in his class and she wasn’t barking, lunging or taking any notice of them!…It is absolutely incredible to watch.

Previously in the home we had also blocked all our windows with a plastic ‘film’ to give a frosted effect so she couldn’t see out and bark at everything she saw…..this week we have also managed to remove the film and she really doesn’t bark too much at all.

We still have a long way to go, as she isn’t so good on the short lead yet and though she is better with cars she still doesn’t like the lorries and motor bikes and next doors dog is still a big problem for Judy, but we have come an awful long way in a short time.

IMG_2468

 We are very pleased with her progress and I’ve got to say Steven Havers training is brilliant….it is obvious that he has so much experience with dogs and right from the start he said that Judy wanted to learn.  He concentrates on training the ‘owner’ rather than the dog and he uses praise to reward the dog and not food treats.

Hopefully very soon we can also try and wean her off the tablets that the vet gives her.

So thank you Steven for your continued training and advice and thank you ‘Michelle’ for emailing me with his details.

SAM_1155

.

A Walk In The Park:

.

Last Sunday I woke early and took Judy for a walk in Western Park at 6.45am.

The sun was shinning, there was no one around and it was so peaceful.  I felt like I had discovered a place that no one else knew about, it was absolutely magical.  I have never heard the birds sing this beautifully before.

IMG_2456 IMG_2446

“In the 19th Century ‘Leicester Corporation’ purchased the land for £30,000 to create a park for the people of the ‘West End’ of Leicester and it is one of the largest parks in the City covering 73 hectares.  The park was opened in 1899”.

Leicester City Council work hard maintaining this park and they have recently put lots of signs around giving interesting information about the wildlife here:

IMG_2457

I have lived in this area for nearly twenty years now and it is only since October (when I have been walking Judy) that I have realised how beautiful the park is and how lucky we are to have it on our door step.

IMG_2451 IMG_2447 IMG_2449 IMG_2448

There is also a 400 year old Oak tree in the park, that is nick named the ‘Old Major’.  I have walked past this tree many times without really taking much notice…..but when I stopped and actually took the time to look at it, it is absolutely magnificient.  My photograph below doesn’t really do the tree justice:

IMG_2455

.

There are so many beautiful places around me that I have walked past without noticing or never bothered to go and see.  I feel it is time for me to take more notice of the things that are right under my nose and I will write about them as I do.

“What is this life if, full of care,
We have no time to stand and stare”.

William Henry Davis

.

.

This week in my garden:

.

I started by thinning out my kohl rabi and my beetroot.  I used a pair of scissors to just ‘snip off’ the unwanted plants:

SAM_1120 SAM_1122

My wall flowers had finally finished flowering, so I dug them up and planted the dwarf peas I was growing in guttering.  They were a bit ‘leggy’ but I’m sure they will be fine.  I am trying to plant in every area possible, so I thought the peas would grow nicely using the chicken wire fence as a support.  All I need to do now is stop Judy from destroying them!

SAM_1112 SAM_1113

This week I also planted my french beans and some more lettuces:

SAM_1115 SAM_1116

….And gave the area under my bay tree a bit of a tiny up:

SAM_1117

.

In my home this week:

.

At the beginning of the week Mr Thrift was poorly with a viral infection.  When he started to feel a little bit better, I made him a vegetable soup to get him to start eating again.

I had an ’emergency’ bag of mixed vegetables in my freezer that I used and I’m glad to say Mr Thrift enjoyed it.

SAM_1137 SAM_1138 SAM_1142

(You can find the recipe for the soup here.  I didn’t use all the vegetables in the recipe, I just used the pack of frozen vegetables together with potato and onions).

.

In the home this week I also made a big batch of pasta sauce to freeze.  I love the days when I can take something out of my freezer, defrost it and then just reheat it in the microwave and add it to pasta.

This recipe also doubles up as a pizza sauce too.

SAM_1139

.

I had also ran out of my dishwasher liquid, so I made some more.  I make it with ‘soup nuts’ and it saves me a lot of money in the long run.

You can find the recipe here.

SAM_1143

.

As you have probably guessed, I struggle to sit still and I like to keep myself busy….On Sunday I mentioned to Mr Thrift that our bathroom looked awful.  I gave it a lick of paint when we first moved into our house thirteen years ago and it hasn’t really been touched since then. The plan has always been to have a new bathroom suit as the bath, sink and tiles are really old and have seen better days, but we certainly can’t afford this for a very long time.

SAM_1127 SAM_1128

Over the years our window blind had also become discoloured in places too:

SAM_1144

…..So on Monday I decided to spruce it up a little by giving it a lick of paint….it actually took two coats in the end, but I was very pleased with the result.

I put up a new blind and changed the light and shower cords, so they looked fresh and new.

SAM_1151 SAM_1150

After I put the shelves back up I gave all the families toiletries a good sort out and put them back neatly.

SAM_1146 SAM_1147

I then put our shower curtains back up….unfortunately we have to use the curtains to stop any water from going down the side of the bath.  We have tried numerous times to seal between the tiles and the bath, but unfortunately it never works as the bath is slightly too far away from the wall!…so we have resorted in lining the shower area with two large shower curtains.  Unfortunately this area doesn’t look good, so I cover it with a ‘nicer’ shower curtain on the outside of the bath:

SAM_1152 SAM_1149

Incidentally, you can see in the photo above my handwash.  This is a Marks and Spencer ‘luxury’ hand wash bottle that I refill each time with cheap ‘value’ bubblebath…..no one ever knows and it saves me buying expensive handwash.

So overall, I am very pleased with our bath room.  It still needs ‘gutting’ in the future, but until then it doesn’t look quite as bad:

SAM_1145 SAM_1153

.

Thank you for reading my blog today.  I will be back next Friday at my usual time.

Have a good weekend!

A Chicken & Parsnip Stew Recipe

I’ve really enjoyed this week as I have been putting my new kitchen to the test and I’ve got to say it is a dream to work in.  I have space to put things down, which is a luxury I am just not used to.

SAM_7557

I started by making a loaf in my breadmaker and I had forgotten how delicious homemade bread tastes.  We have been eating shop bought bread for the last eight weeks and it has cost us a fortune.  Due to my daughter’s dairy intolerance I have been buying Warburtons bread whilst the builders have been here, but it costs £1.45 a loaf!

Today I worked out that the large loaf in my breadmaker costs just 42p to make.

I use my bread slicer to slice my bread and I get approximately fourteen slices from it, which works out at 3p per slice.  Warburtons bread works out at 7p per slice, though I can see it is very easy and convenient to just pick up a ready made sliced loaf from the shops.  However, homemade bread does taste lovely and I know what goes into it.

.

I also wanted to put my new cooker to the test, so I made my tried and tested easy cake recipe to see how it faired and it cooked it brilliantly.  I love this recipe as you just throw all the ingredients in a bowl and mix it all together.  You can find the recipe here.

As we haven’t had a homemade cake for ages I wanted to make it special for my daughters, so I put normal butter icing on one side (which my eldest daughter really likes) and chocolate butter icing on the other (which my youngest daughter really likes).  I also used homemade strawberry jam to sandwich the sponge layers together.

It felt like a real treat  to have  homemade cake again whilst sitting at our table, it’s something we have all missed.

OLYMPUS DIGITAL CAMERA

.

I also made some flapjacks for my daughter to take to school in her packed lunch and these also cooked lovely in my new oven.

SAM_7558

.

Another cake I made this week was my christmas cake.  I have usually made it by now, but it doesn’t matter as this recipe can be eaten the day you make it if you wanted to.  I always use the same recipe as it is easy and taste lovely.  You can find the recipe here.

SAM_7553

My recipe uses ground almonds and I have had a problem buying them this year in the supermarkets…I wonder if anyone else reading this has had the same problem or knows why this is?

In the end I bought flaked almonds and ground them up in my food processor:

SAM_7554 SAM_7556

The christmas cake turned out well and is now wrapped up in greaseproof paper in my pantry.  I will ice it nearer the time after it has had another few spoons of brandy poured into it.

 SAM_5166.

Last week, my good friend Arlene, dropped round to give me a ‘kitchen warming’ present. She gave me the cast iron pan, that you can see in the photograph below.  She had only used it once as the burner on her hob was not strong enough to heat the whole base of the pan.  She knew I now had a large burner on my hob and thought I would like it and she was right.

SAM_7565

So I decided to cook a Chicken and Parsnip Stew.

As it ages since I have posted a recipe on my blog, I thought I would share how I made it.  Parsnips are really great to add to stews in winter and they are even sweeter now we have had a frost.  I love parsnips in winter when there aren’t many vegetables around and they store really well in the ground.

.

 Chicken and Parsnip Stew.

.

2 tbsp olive oil

6-8 chicken pieces (I used legs and thighs)

1 onion chopped

4 medium parsnips roughly chopped

6 large mushrooms chopped

1 ½ pints of chicken stock

.

Preheat your oven gas 5 / 190C / 375F.

Heat the olive oil in a large ovenproof, lidded casserole dish.

SAM_7561

Add the chicken pieces.

SAM_7562

Cook the chicken pieces until they are golden brown on all sides.

SAM_7563

Add all the other ingredients and finally pour the chicken stock over it.

SAM_7564

Cover the dish and cook in the oven for approximately two hours, or until the parsnips are soft and the chicken is cooked.

.

Enjoy!

SAM_7569

.

Thank you for reading my blog today.

I will be back on Monday at my usual time.

What Do You Do With Hundreds Of Courgettes?

I always look forward to the first courgette of the year as it means summer really is here.  I get excited watching it grow, waiting for the day I can pick it:

SAM_2741 SAM_2742

When I do pick it, I nearly always use it in a lovely courgette, onion and cheese omelette and we always comment on how lovely it is to have the courgettes at last, as it seems such a long time since we last picked them the year before.

SAM_2629

The first couple of weeks are like a ‘courgette honeymoon’, as it’s so lovely to use them in our summer meals.

Every day I check for more courgettes on my plants and the plants keep producing them.  They just keep coming…

SAM_7075

…and coming…

SAM_2627

…and coming…

SAM_2246

…and coming!

In fact by mid-summer they seem to be laughing at me and ‘popping out’ overnight from where they have been hiding and every basket of goodies havested at the allotment has a least a couple of courgettes in:

SAM_7119 SAM_7097 SAM_3398 SAM_3968 SAM_2763

.

So what on earth can you do with all the courgettes that you pick?

.

I have read quite a few articles in books and magazines on this subject, but half the recipes I’ve read are not really realistic for everyday meals, or are really time consuming recipes (and I haven’t got too much time to cook the courgettes as I’m too busy picking them).

So I thought I would talk about what I do with the millions of courgettes that I grow:-

.

I use courgettes in everyday meals like pasta bolognaise, curries and chilli’s…

Pasta Bolognaise

Pasta Bolognaise

.

I also use them in pies like my Chicken, Courgette and Broccoli Pie.  You can find the recipe here.

Chicken, Courgette and Broccoli Pie

Chicken, Courgette and Broccoli Pie

.

Courgette Frittata’s are nice too.  The recipe is here.

Courgette Frittata

Courgette Frittata

.

I also add them in the Pasta / Pizza Sauce recipe I make.  After it is cooked I whizz the sauce up with my stick blender and no one ever knows and then I use my sauce as normal.  You can find my pasta / pizza sauce recipe here.

SAM_2440

.

Courgette chutney is one of my favourite chutneys.  I use this recipe, but replace the scallopini’s (patty pans) with courgettes.  It keeps for ages and is lovely served with cold meats and on sandwiches.

Courgette Chutney

Courgette Chutney

.

I also use courgettes to make savoury scones.  Cheese and courgette scones are absolutely delicious and can be frozen ready to pop into lunch boxes in the morning, before work and school.  The recipe for cheese and courgette scones is here.

Cheese and Courgette Scones

Cheese and Courgette Scones

.

One of the favourite things I make with courgettes is a Chocolate Courgette Tray Bake Cake.  No one ever knows the cake has courgettes in and this way the kids get a few extra vitamins, without realising it.  The recipe is here.

Chocolate Courgette Tray Bake Cake

Chocolate Courgette Tray Bake Cake

.

One other thing I do with my courgettes is to freeze them.  I have a bag of sliced courgettes and diced courgettes which I open freeze on trays before bagging up, so they don’t stick together.  I never blanch my courgettes first and they always seem to be ok for use over the winter.

I also bag up grated courgettes in the exact quantities ready to make the courgette cheese scones.  This way I can just take a bag out of the freezer the night before, to defrost ready to make the scones.

Courgettes sliced and diced ready for freezing

Courgettes sliced and diced ready for freezing

.

Finally, I use the courgettes in different soups.  A particularly nice soup is a Courgette, Potato and Cheese soup.  The recipe is below:

.

Courgette, Potato And Cheese Soup

.

500g potatoes, peeled and chopped into small pieces

1 pint of vegetable stock

1 kg of courgettes, washed and chopped into small pieces

1 bunch of spring onions, washed and sliced small

100g grated cheese

Salt and pepper

Ground nutmeg to serve.

.

Put the potatoes into a large pan, cover with the vegetable stock and bring it to the boil.  Simmer for 10 minutes.

Add the courgettes and simmer for a further 15 minutes, stirring occasionally.

SAM_7104 SAM_7105

Put a few spring onions aside to garnish the soup when you serve it.  Put the remaining spring onions in the pan and simmer for a further 5 minutes.

SAM_7103 SAM_7106

Add the cheese, stirring it until it has melted.

SAM_7107

Take the pan off the heat and use a stick blender or liquidiser to smooth the soup.

SAM_7108 SAM_7110

Return the pan to the heat and bring back to the boil, adding salt and pepper as required.

Serve the soup with a sprinkling of ground nutmeg and garnish with the remaining spring onions.

SAM_7112

.

I hope you enjoyed my blog today.  If you do anything different with your courgettes, it would be lovely to hear from you, so please leave a comment at the bottom of this post.

I’ll be back on Friday at 4pm.

Have a good week.

Onion Sets, Peas And Watercress

There has been some lovely warm weather this week and I have been working at my allotment in short sleeves at last.

On Tuesday I noticed the temperature in my polytunnel rose to nearly 37C, even with both doors wide open.

It was lovely to see that bees, butterflies and other insects were coming into the polytunnel, attracted by the mizuna that I can’t bring myself to dig up yet, as it is so beautiful.

Mizuna in flower

Mizuna in flower

.

I spent this week planting my onion sets.  I started my onion sets in modules this year, as the soil was in no fit state to plant them direct last month.  I was very pleased with the result as most of them had started to sprout:

SAM_6179

I am hoping this will be a one-off though, as it takes extra time to plant the sets in modules and obviously uses extra compost.  I planted 416 onions all in all, including 80 red onions and I’ve got to say my back did ache a bit afterwards.

This year is really an experimental year with my onions, as I had a problems last year with the allium leaf miner, especially on my overwintering onions.

In autumn, I planted seed sown onions instead of sets (in the hope they would be stronger plants) and covered them in environmesh.  I have also planted summer onions that I sowed in January (again, in the hope they will be stronger plants) and two different varieties of onion sets, in the hope that one may grow stronger than the other.

The two varieties of onions sets I planted this year are ‘Turbo’ and ‘Sturon’.

SAM_6180

The allium leaf miner is a pest that was only detected in Britain in 2002.  It has been spreading rapidly since and spread to many places in the Midlands for the first time last year and unfortunately found my allotment site too.

The allium leaf miner isn’t choosy which allium it attacks.  Alliums include onions, leeks, garlic and shallots.

You can find details of the allium leaf miner here.

.

I have also been planting peas again this week.  I have planted some mangetout as my youngest daughter absolutely loves them (though she won’t eat peas, which is very strange), so I would be in trouble if I didn’t grow them. I grew them in guttering as I find I have a better germination rate this way.  You can read how I grow my peas in guttering here.

SAM_6107

I also grow a tall, climbing variety called ‘Pea shooter’, which are really sweet, large peas.  The peas were expensive to buy, so I saved some seeds last year and I am pleased to say that they germinated really well.  I made a frame out of canes tied together and draped pea and bean netting over it, so the peas will have something to climb up onto.

There is nothing like opening your first homegrown pea pod straight from the plant and eating the wonderful, sweet tasting peas inside.  It is something I look forward to every year.

My tall, climbing peas

My tall, climbing peas

As the weather is warming nicely, I decided to sow my watercress.  Eric (the gentleman who had the fourth plot before me) always grew a really good crop of watercress in a great big black pot, so last year I decided to give it a try and it worked really well.  I just sprinkled the seeds and covered them with a small amount of compost and I  just made sure I didn’t let the compost dry out.  This was the result:

My watercress in 2012

My watercress in 2012

When it began to flower, I left it to set seed and I was surprised to get a second growth of useable watercress.

This year I replaced the top inch of compost with new compost and sowed new seed.  I covered the moist compost with glass to help the seeds to germinate.

I am looking forward to the results.

SAM_6221

.

This week I have been working on this years wildflower patch, as last year I was really pleased with it.

I have been raking the area to produce a fine tilth (a fine crumbly soil) and yesterday, I mixed the wildflower seeds with horticultural silver sand and scattered it over the area, avoiding the foxgloves I had transplanted in the patch.  I raked the seeds in, covered them with net to protect them from the birds and hoped the forcasted rain would come.

SAM_6220

If the patch is only half as good as last years, then I will be very pleased:

SAM_2726

I noticed my comfrey patch is growing well now.

I use comfrey a lot at my allotment.  Comfrey is high in potash, as the deep roots of the Comfrey plants absorb the potassium from the subsoil. Therefore it’s great for using on most fruits and flowers, including tomato plants.

I add comfrey to my compost bins, as it is a great ‘free’ activator and I use it as a mulch around plants.  I also have a water butt which I use solely for ‘comfrey tea’, which I use to feed certain plants.  You can read how I make it on one of my very first posts, here.

SAM_6222

.

I thought I’d mention a few of things I have harvested this week too.

Over winter, we have been eating the cabbages I sowed last summer.  The variety is ‘Robinson’s Champion Giant Cabbage’.  They have stood through all the wet and snowy weather the winter threw at them and I am really pleased with the results:

SAM_6192

.

My purple sprouting broccolli is doing well and tastes delicious.  It takes approximately a year to grow from seed, but it is so worth the wait:

SAM_6191

.

And finally, remember I put a ‘bin’ on my rhubarb in February, to ‘force it’….

SAM_5812 SAM_6202

I removed the bin and the rhubarb was beautiful and pink.  I could actually smell the sweetness as I removed the dustbin.  I will be making rhubarb crumble tonight, as it’s my favourite.

If you want to make something different with rhubarb, you could try a Rhubarb and Ginger Cake, which is just as nice.  This recipe is here.

.

There is always some confusion about composting rhubarb leaves, as the leaves are high in Oxalic Acid, which is toxic to humans, but this is broken down and diluted in the compost heap as the leaves decompose.  So yes, it is safe to put rhubarb leaves into your compost bin.

Also, a long time ago when I pulled my very first rhubarb stalks from the ground, one of the ‘wise old allotment chaps’, saw me chopping the leaves off.  He told me to always leave part of the leaf on the stalk, so it looks like there are three claws left (like a chickens foot):

SAM_6205

When I asked why, he told me the reason for this is because the end always dries and you chop it off again when you are preparing it for cooking.  This way, you don’t waste any….and he was right!

SAM_6215

I hope you have enjoyed reading my blog today.

I will be back again on Monday at approximately 4pm.

Enjoy your gardening weekend.

A Frittata Recipe With ‘Leftover Vegetables’ And A Week Of Allotment Work

It has been a very busy gardening week at my allotment.

I started by feeding my fruit bushes and trees with ’sulphate of potash’, which is a good feed for fruit and flowers.  I sprinkled it around the plants and forked it into the soil and then I gave them all a layer of my own allotment made compost:

SAM_5855 - Copy SAM_5856 - Copy

I also planted broad beans at my allotment.   I sowed the beans in December and they had sat quite comfortably in toilet rolls, in my cold greenhouse at home.  I raked some blood, fish and bone fertiliser into the soil before I planted them  (it is better to rake this into the soil two weeks before planting, but I was a bit late doing this).  I planted two double rows, each plant 20cm apart and approx. 60cm between the double rows:

SAM_5880 - Copy

Another thing I planted was the garlic I had sown in pots in my cold greenhouse over winter.  Unfortunately, I lost most of the garlic I planted directly into my allotment soil, before Christmas.  I think this was probably due to the constant wet weather we had.  I’m glad I planted the garlic in pots as a backup now:

SAM_5882 - Copy

Remember my bean trenches?  I finally finished filling the second trench with peelings etc. and I covered the trench with soil.  The runner beans will love to be planted here at the end of May, as they love deep, moist, fertile soil.

SAM_5848 - Copy SAM_5849 - Copy

I also received the snowdrops ‘in the green’ that I ordered a couple of weeks of ago and planted them in my new woodland area.  If you have read my blog recently, I ordered these so I can remember my friend who passed away last month due to a brain tumour.  Snow drops were in flower when she died and the snow fell heavily during her funeral and she would have loved how pretty it looked.  It seemed fitting to plant snow drops in my woodland area that will always remind me of her:

SAM_5853 - Copy SAM_5854 - Copy

It has been a really tiring week as I started to prepare my potato patch ready for planting next month.  I started by digging up my remaining leeks and parsnips:

SAM_5895 - Copy SAM_5890 - Copy

After this, I forked in loads of manure.  When I am moving and spreading my manure, I always wish I was a 20 year old fit male, instead of a 46 year old struggling female!  I find this job such hard work and I’m glad I’ve finished it now.

SAM_5888 - Copy

Later, I froze the parsnips by peeling them and chopping them into roughly equal sizes.  I blanched them for two minutes and then froze them on a tray before bagging them up.

By freezing the parsnips this way, I can remove the required amount of parsnips from the freezer and roast them from frozen with my roast potatoes on a Sunday lunch time.

SAM_5894 - Copy

I froze the leeks exactly the same way.  These will be used in soups, spag bogs, chilli’s etc.

You can read how to freeze vegetables here.

SAM_5852 - Copy

.

Today, I thought I’d share a really easy recipe with you, that I cooked this week.  It’s a good way to use up cooked vegetables that are left over from the night before and it is so filling:

.

Frittata with Leftover Cooked Vegetables:

8 eggs

Leftover cooked vegetables e.g. potatoes, peas, carrots, French beans

1 Courgette (I use ready sliced courgettes that I froze last summer)

1 Onion

A handful of parsley (again I use parsley that I froze last summer)

2 tablespoons of olive oil

A handful of grated cheese

Salt and pepper to taste

.

 Heat the olive oil in a large frying pan.

Fry the onion and courgettes over a medium heat, until soft.

SAM_5836

Add the leftover veg and continue to fry until they are heated through.  Add the parsley.

SAM_5839 - Copy

Meanwhile, whisk the eggs and add the salt and pepper.

Pour the eggs over the vegetables and cook gently, without stirring, until the egg is approximately two thirds cooked.

SAM_5840 - Copy

Sprinkle the egg with the grated cheese and put the pan under your grill for a further few minutes until the egg is set.

SAM_5841 - Copy

Slide the frittata onto a plate.

SAM_5842 - Copy

Cut into slices and serve hot with a nice crisp home grown salad.

SAM_5845 - Copy

Thank you for reading my blog today.

I’ll be back again on Monday.

Clearing My Wildflower Patch And A Chicken Zorba Recipe

This week at my allotment I have been clearing the wildflower patch that flowered so beautifully, for so long.

You can read about my wildflower area here.

I knew my plot was too wet to dig from all the rain we have had recently, so I worked on an old plank so I didn’t destroy the structure of the soil.  The plank spreads my weight evenly over a large area.

Just in case anyone is unsure, as a general rule, if the soil sticks to your boots then it is too wet to dig.

I’m very pleased with the work I have done and all the old wildflowers are sitting in my compost bins, at the back of my plot.

When it has dried out a bit, I will fork the soil over lightly to prepare for next years wildflowers.

There are still loads of things for me to clear and jobs to do at my allotment.  I just hope the soil dries soon, as it’s frustrating that I can’t get onto the soil properly.

.

.

Today I’d like to share a recipe with you, that I made on Wednesday night for my daughter’s birthday.  It is a bit more expensive to cook as it uses chicken breasts, but it is a treat and we all love it.

This recipe is a Sainbury’s recipe that I have been cooking for many years, though the original recipe uses lime juice and fresh mint.

If you haven’t got the herbs and spices in your store cupboard it can work out expensive, but if you do a lot of cooking then you will use these herbs and spices regularly anyway.

.

Chicken Zorba

 Juice of 2 lemons

1 teaspoon ground coriander

1 teaspoon ground cumin

½ teaspoon turmeric

1 teaspoon dried mint

4 boneless skinless chicken breasts

A tablepoon of olive oil

.

Roughly chop the chicken breasts into cubes.

In a small bowl or a cup, mix the lemon juice, coriander, cumin, turmeric and mint.

Pour the herb and spice mix over the chicken and mix well so the chicken is all coated.

Leave the chicken in the fridge for at least 30 minutes.

Heat the olive oil in a frying pan and then add the chicken.  Cook for approximately 10-15 minutes, stirring occasionally.

The chicken will be a golden colour when it is cooked, but do check it is cooked right through to the centre.

.

The Sainsbury’s recipe suggests serving the Chicken Zorba with pitta, natural yoghurt and salad.

I served it with roast potatoes, pilaf rice, salad, pitta, sweetcorn, houmous and natural yoghurt…well it was a special occaision wasn’t it!

You can find the recipe for houmous here and how to make yoghurt here.

Thank you for reading my blog today.