On Tuesday this week I dug up my cauliflowers, which were a heritage variety called ‘English Winter’, which I sowed in May last year. They stood all winter long and I was a bit concerned that I would just have leaves without the lovely white cauliflowers….but finally in April the cauliflower heads began to form and the result was beautiful large white caulis.
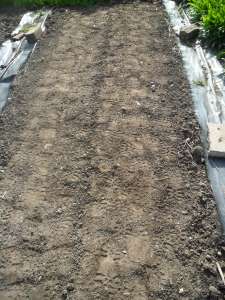
The ground where they had stood for a year was as solid as a rock and it took me ages to fork the soil over. I then raked a dusting of Blood, fish and bone over the area and then planted the red onions that I sowed back in January this year.
This week I planted some more cauliflowers that I sowed on the 14th February. They are a variety called ‘All year round’. As usual I walked, danced and jumped all over the area, as cauliflowers especially like firm soil and this helps to stop them from ‘blowing’. It also helps to add organic matter in the autumn, so it has time to settle.
After planting the cauliflowers I tread around the plants with my foot and then I cover the cauliflowers with environmesh to stop any little flies getting into the curds when they form.
.
I noticed my curly kale is now flowering beautifully. If I don’t need the area straight away, I leave the kale to flower as the bees love it:
.
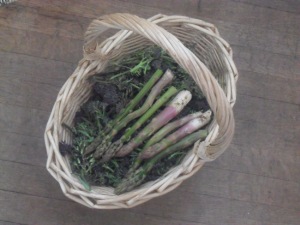
This week I picked our last purple sprouting broccoli, which is quite sad as my youngest daughter loves it….but I also picked our first asparagus of the year which is great.
When I walked around my plots I noticed my first globe artichoke is forming which is also great….my in-laws love these so I make sure they have the first ones of the season:
.
One of the jobs I completed this week was to cut down my comfrey before it flowers, so it doesn’t self-seed everywhere.
I put some of the comfrey into my compost bins as it is a great compost activator and I used some of it to make an enormous pot of comfrey tea.
Comfrey tea is high in potash as the deep roots of the Comfrey plants absorb the potassium from the subsoil. Therefore it is great for using on most fruits and flowers which is why I have a whole bed dedicated to comfrey plants, which I cut down three or four times during the growing season. If you are buying comfrey to grow, the experts tell you to use a variety called ‘bocking 14’ which doesn’t self-seed, however I just took a root cutting from my neighbours allotment to get me started and I didn’t have a clue which variety it was. Self-seeding has never been a problem for me as I always cut it down before it flowers.
To make comfrey tea all you have to do is fill a bucket with the comfrey leaves and stems and weigh it down with a brick and pour over cold water. I cover it (to stop flies getting in) and leave for approx. two weeks. Be warned, by this time the smell is revolting! Strain the comfrey tea liquid into another container and put the remaining comfrey in your compost bin. I then put 2 cups of comfrey tea into a watering can and then fill with water. I use this feed once a week after the first tomatoes begin to form.
As I use a lot of comfrey tea, I made mine in a water butt. I put the comfrey into an old curtain and then weighed it down with a brick and I will leave it for a couple of weeks with water covering it. I always make sure I cover the liquid with an old piece of wood or a lid, as once I didn’t and I ended up with maggots in it!
After two weeks I will remove the comfrey and put it into my compost bin. The result will be lots of smelly comfrey tea liquid, which is free to make and the plants love it.
.
This week I also sowed my wildflower seeds. I had previously raked the area to remove any large clods of earth.
I mixed the seed with dry horticultural sand and then scattered the sand & seed mixture over the area and raked them in.
I then covered them with bird netting until they germinate.
If they are half as good as the last two years wildflowers, then I will be pleased.
.
I also noticed that one or two strawberries have started to form, so I surrounded the strawberries with straw.
The straw stops the mud splashing on the strawberries but it also acts as mulch, keeping the moisture in and stops annual weeds from germinating. I made sure it had rained before I spread the straw to ensure that the ground was moist.
The bale of straw only cost me £3.40 from my local plant nursery, so it was really worth it. I also had some left over to use elsewhere if I need it too.
When I looked closely I noticed that a few of my strawberry flowers had turned black….these are the ones that the frost caught last Friday and sadly they won’t turn into strawberries now:
But not to worry, there are plenty that beat the frost:
.
Inside my polytunnel I removed the perpetual spinach that had turned into a triffid …it had gone to seed and was now huge!
I dug it up and replaced it with a couple of barrows of compost from my homemade allotment compost, ready for my next crops.
.
I noticed next to this area, the two rows of carrots had started to germinate with the radish in between that I sowed on the 11th April.
The lettuces in my polytunnel will also soon be ready.
The only thing I am disappointed with so far is my tomato plants. I had four greenhouse tomato plants spare, so I put them into my polytunnel. Unfortunately, even in the polytunnel last week’s frost managed to damage some of the leaves which is a shame, but I can already see new growth in the centre so hopefully they will be ok.
.
Finally, I planted some lavatera that I have grown from seed. These are the hardy annual type that do not become thugs and they will live and die in one season. They grow to about 60cm high and will hopefully look beautiful and again attract beneficial insects to my plot.
Thank you for reading my blog today.
I will be back at my usual time on Monday. I hope you have a good weekend.


Reblogged this on Linda's wildlife garden and commented:
Lovely post and thank you for sharing with us must make some comfrey tea got nettle tea on the go at the moment
Nettle tea is great too (they do both smell lol). Have a good weekend Linda
Thanks just need to rember which like nettle tea
hello , you have been overcharged for your straw , I don’t know where you live but if you look in your local paper under the horse section , there is usually a fodder section straw is a lot cheaper than what you paid even for 1 bale . Jeanette wilson Date: Fri, 9 May 2014 15:01:17 +0000 To: jeanettewilson284@hotmail.com
Thanks jeanette I’ll look into it.
Caulies over wintered, gees! I have learned over the last few months to stomp around my brassicas too.Loving my comfrey since I bought a few roots a couple of years ago, I add nettles and have never bought liquid feed since. I have a little brown on 1 tomato plant too, but doing good too. Great post, thanks x
Thanks Cath. Liquid feed is great isn’t it
The best and free!
That frost was quite bad, but glad not too much damage was done. We pay £2 for a bale of straw, but it is straight from the cutter, have a good weekend.
Sue
You too Sue
I’ve had spinach that turned into a triffid, too!
Your cauliflowers look great. Think I have got the same variety as you this year and am hopeful I get a crop this year.
They are great to grow…very slow growing but worth the wait. By the way, welcome to my blog.
I have had success – limited – in the past with cauliflowers but I think the seeds were too old last year. Anyway, looks like you’ve got your gardening techniques sorted 🙂
Lots of useful info here, thank you! I’ve just planted comfrey for the first time this year (Bocking 14 – it’s supposed not to set seed – I hope!), so this is really useful.
Glad to be of help alderandash and welcome to my blog